

Emailing is the primary medium for professional conversations. Be it networking in the industry or inter-office conversation; you will need to send mails everyday.
But, what about conversations in different time zones? What if you want your message to reach the recipient’s inbox in their convenient time?
For instance, if you are working in PST timing and you want to send mail during office hours in another time zone. Then?
This is where scheduling the send time comes. This write-up is a step-by-step guide on how to schedule email in Zoho.
Let’s get started.
Zoho Mail is an emailing service by Zoho Corporation Pvt. and yes, it features a “Send Later” option. Using this feature you can schedule a message to be sent at your chosen time.
You can also use this option to send mass emails (recurring emails) at a set time interval, but for that you need to integrate it with a cold email software like Smartlead.
To learn how to schedule a mail in Gmail, go there, and to learn how to do the same in Zoho, keep reading this.

Step 1: Log in to your Zoho mail account with your email address and password.
(If your account is secured with Two Factor Authentication (TFA), generate the Application-specific Password to log in.)
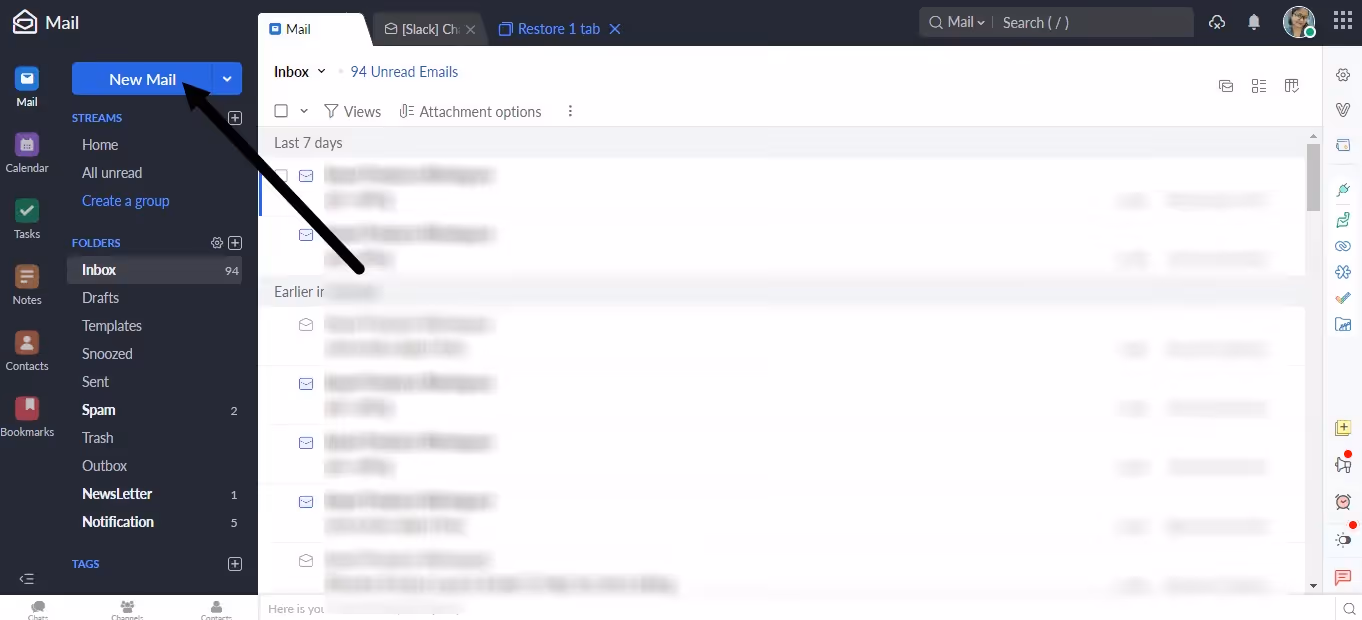
Step 2: Go the “New Mail” option shown in the below image and click there
If you are using it from a phone, go to the menu button to find it.
Step 3: Compose a mail or modify an email template. Add attachments, signatures, etc.

Step 4: Don’t click on “Send”. Instead, click on the “Send Later” option. Check out the below image for reference.

Step 5: Now, schedule the mail in your choice of time.
As you can see, you can schedule for after 10 mins, 1 hour, tomorrow, and also for customer time.
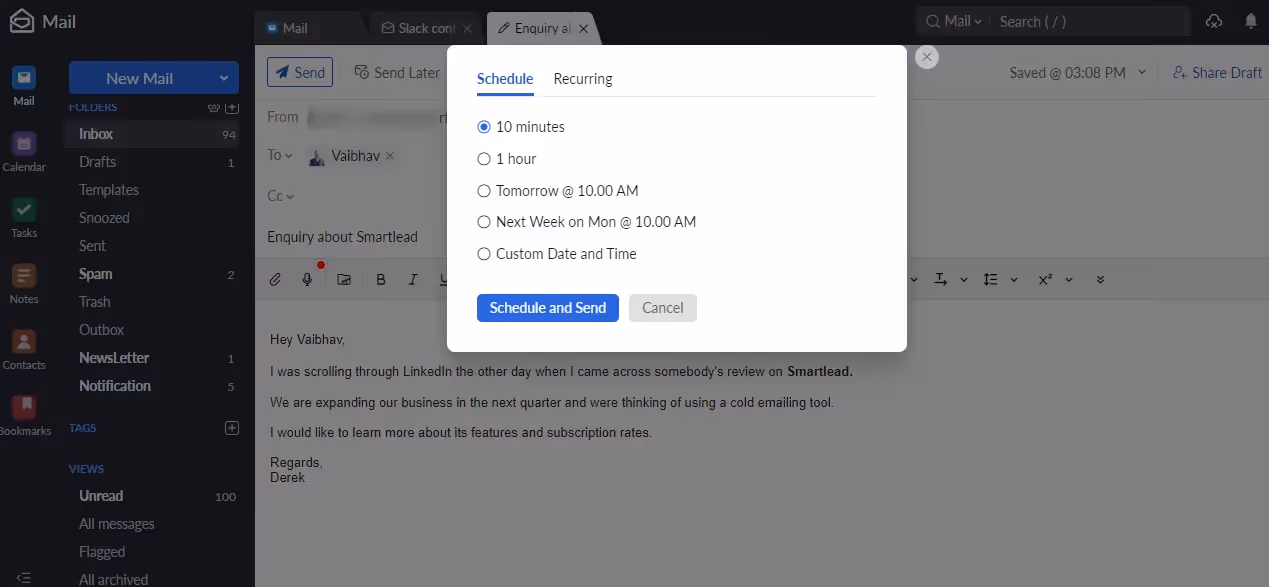
Step 6: If you want to send mails to a different time zone, then click on the “Customer Date and Time” option. It will open a pop-up box as shown below.

Step 7: Click on the “Save” option and you are done.
Step 8: Last step, click “Send”. Until the time you have scheduled them, your scheduled mail will be in the outbox folder.

Many marketers send recurring mails to increase customer engagement. Hands down, this feature makes Zoho Mail one of the most powerful tools for salesforce. It not only helps with email campaigns but also makes sending bulk emails easier.
Step 1: Log in to your Zoho mail account with your credentials.
(Use the Application-specific Password to log in if your account is secured with Two Factor Authentication (TFA).)
Step 2: Go to the “New Mail” option.
If you are using it from a phone, go to the menu button to find it.
Step 3: Write the email content
(If writing it sounds too much of a hassle, then pick an email template from here.)
Step 4: Click on the “Send Later” button and a pop-up box will come up as shown below.
Step 5: Instead of scheduling the send time, go to the “Recurring” option on the left of the pop-up box. It will lead to a box like this:

Step 6: Click on the “repeat”. You will have four options to decide the period of time.
Step 7: Go to the “recur” option to customize the delivery time. You can decide how often you want to send the message too.
Step 8: Choose the time zone your recipient lives and pick a suitable hour for them.
Step 9: Click save
Step 10: Last step, click “Send”. Until the time you have scheduled them, your scheduled message will be in the outbox folder.
To automate follow-up email, check out this tool.
The timing of your emails can significantly impact their success, especially when sending cold emails or conducting outreach in different time zones. Scheduling the send time of your emails ensures that your messages reach your recipients at the most convenient and engaging moments.
While Zoho Mail provides a "Send Later" feature for scheduling emails, it's important to note its limitations, particularly for bulk email campaigns. Zoho Mail's daily sending limits may hinder your ability to efficiently reach a larger audience.
For those looking to maximize the impact of cold emails and bulk campaigns, Smartlead is the perfect alternative. Smartlead offers the capabilities needed for effective mass emailing and scheduling, empowering you to tailor your outreach for optimal results.
In conclusion, scheduling the send time of your emails is a strategic move to enhance engagement and response rates. While Zoho Mail may suit your needs for regular email communication, when it comes to effective cold emailing and bulk campaigns, Smartlead is the recommended choice for achieving success in the world of digital outreach.

A scheduled mail stays in the Zoho outbox till its “scheduled time”. Once it reaches the time you have scheduled, it will automatically reach the recipient’s inbox.
Go to the Outbox folder in Zoho Mail to stop the scheduled mail from reaching the recipient’s inbox. There is a schedule icon in the Outbox listing. Click on that. It’s next to the relevant email. Now, you will see a “Stop Schedule button” on your screen. Click on the button and stop email scheduling. It will automatically be saved as a draft in the Drafts folder.
This feature is available for Contacts, Deals, Leads, etc. Using this option, you can send updates and personalized follow-up emails to your prospects and customers.
Join us to elevate your outreach!

Founder, StackOptimise
Smartlead's combination of automation, unlimited inboxes, and easy campaign management has completely transformed how we run cold email campaigns.
.jpg)
Founder, Cold Email Hackers

We have about 15 companies and we use Smartlead for all of them.

Founder, DutchSave Media
One of the things I love about using Smartlead is the deliverability feature. If they landed in the bounce or spam folders, we could resolve this quickly.

Co-Founder, Growth Today
I want to continue to use Smartlead to make operations more seamless - the plan is to bring more clients here and build more SOPs.

Founder, FueltoFly
Smartlead listens to the agencies and customers and builds according to what people want, that has really made things easier for us.

Founder, OutboundSync
We build an infrastructure product, and OutboundSync communicates with Smartlead itself. I love the webhook and API. They're really well done and keep getting better.

Founder, Axoleads
With SmartDelivery, you can put all of that in the hands of the tool. It ensures your emails land in inboxes, and by running a simple test, you can see if you're hitting the mark.

Founder, Claygen
Deliverability is the cornerstone of cold email outreach. You could have the best email copy in the world, but if no one is seeing it, it's useless. I really love the feature where you can actually give client accesses to your clients.

Co-Founder, Cymate
I do not want to switch to another software. Pick a solution you trust, stick with it, and keep refining your copy.

CMO, Avalanche Capital
Managing large volumes of emails through multiple inboxes used to be a logistical nightmare. With Smartlead, the process is seamless. We book thousands of discovery calls through cold emails. These campaigns are generating leads at a scale we never thought possible.

Founder, Growth Engine X
We came for the unlimited inboxes, and we stayed for the API. 1.5M cold emails/month, 7,767+ inboxes managed.

Head of Community & Ecosystem, TxtCart
You cannot replace having 10,000 touches with potential clients. When you have that much distribution and reach, you really start to see incredible results. The simplicity of Smartlead made all the difference. It doesn't require you to be a technical wizard.

Founder, Hyperke
Smartlead has been a game-changer for us. It increased our appointment volume, improved ease of use, and offered valuable features. 80% increase in appointments/month, peak of 276 appointments in a single month.

Founder, Kinetyca
Smartlead has been our cold email backbone from day one. The platform evolves constantly, keeping pace with how deliverability and personalization need to work today. 21% overall reply rate, $175K in 4 months for multiple B2B clients.

Founder, Reachflow
Smartlead is centered around deliverability and constantly evolving. Their API is not like any other platform. Smartlead covers all our needs. The focus on core features like deliverability and API integration is unmatched.

CEO, Halfwarm
Our approach to crafting conversational emails led to reply rates that many of my peers thought were unattainable.

Co-Founder, letstrike
We've grown on zero capital, zero marketing, purely cold emailing - and that's the story we love to tell. The best approach is no approach if you can't handle domain meltdown. The second best is something like Smartlead that's built from the ground up for deliverability at scale.

Founder, Fenixtal
Smartlead's white-labeling and automation let us punch above our weight. The 12M euros sales potential? That's what happens when you combine human creativity with Smartlead's precision.

Co-Founder, Digital Creativs
Nine out of 10. Ninety percent of our clients are on Smartlead unless they come in with an existing setup. That's the default.

Co-Founder, BuildingReach
At the end of the day, you have to take a bet on one tool or another. It was a no-brainer taking that bet on Smartlead. We had to even turn down the volume of our marketing campaigns - Smartlead was capable of driving more volume than our sales team was able to fulfill.

Founder & MD, Prospectiv
Since starting the business in January of this year, we've already generated $200K in sales exclusively from cold email. Smartlead has been central to our operations and has exceeded our expectations.

Founder, Growthlynk
There's so much stuff built on top of it. I would be dead if I had to rebuild it with another tool. I can manage hundreds of senders easily. I can send hundreds of thousands of emails.

Founder, Corebits
The platform's HubSpot integration, real-time Slack updates, and advanced campaign customization have been game changers for our business and our clients'.
Founder, Apex Ascension
From day one, we've never used anything else.


